A Comprehensive Guide to Starting Flower Seeds Indoors
The anticipation of vibrant blooms gracing your garden can be a thrilling experience for any gardening enthusiast. To ensure a bountiful and early display of flowers, starting seeds indoors is a rewarding and practical approach. This comprehensive guide will walk you through the steps, tips, and techniques for successfully starting flower seeds indoors, allowing you to nurture and enjoy the full spectrum of colors, shapes, and fragrances right from the beginning.
Why Start Flower Seeds Indoors?
Starting flower seeds indoors provides several advantages, contributing to a more successful and enjoyable gardening experience. Here are some compelling reasons to consider indoor seed starting:
Extended Growing Season:
Starting seeds indoors allows you to get a head start on the growing season. By initiating the germination process indoors, you can transplant well-established seedlings into your outdoor garden when the weather becomes favorable, giving your flowers a jumpstart on growth.
Greater Variety of Flowers:
The range of flower varieties available as seeds is extensive. Starting seeds indoors provides the opportunity to explore a wider selection of flowers that may not be readily available as young plants at local nurseries. This opens up possibilities for unique and exotic blooms in your garden.
Cost-Effective Gardening:
Purchasing flower seeds is generally more cost-effective than buying established plants. By starting seeds indoors, you can sow a large number of flowers at a fraction of the cost, making gardening an economical and sustainable hobby.
Customized Growing Conditions:
Indoor seed starting allows you to control and customize the growing conditions for your flowers. You can adjust factors such as temperature, light, and humidity to meet the specific requirements of different flower varieties, promoting healthy and robust growth.
Educational Experience:
Starting flower seeds indoors provides an educational opportunity for both novice and experienced gardeners. Observing the germination process, understanding seedling development, and experimenting with different growing techniques enhance your gardening knowledge and skills.
Choosing the Right Flower Seeds
Before you embark on the journey of starting flower seeds indoors, it’s crucial to select the right seeds for your garden. Consider the following factors when choosing flower seeds:
Climate Compatibility:
Choose flower varieties that are well-suited to your local climate. Consider the temperature, sunlight, and moisture levels in your region to ensure that the flowers you select can thrive in your outdoor garden once transplanted.
Growing Conditions:
Assess the growing conditions in your home, especially the available sunlight. Some flowers require full sun, while others thrive in partial shade. Select seeds that align with the light conditions you can provide indoors.
Germination Time:
Different flowers have varying germination times. Some seeds sprout quickly, while others may take several weeks. Be mindful of the germination time and plan your indoor seed starting schedule accordingly.
Space Considerations:
Consider the available space you have for indoor seed starting. Some flowers, especially those that grow tall or spread out, may require more space. Choose seeds that match the available indoor real estate.
Personal Preferences:
Select flowers that align with your aesthetic preferences and gardening goals. Whether you’re drawn to vibrant annuals, elegant perennials, or fragrant herbs, there’s a wide array of flower seeds to suit every taste.
Essential Equipment and Supplies
Gathering the right equipment and supplies is a crucial step in ensuring a successful indoor seed starting venture. Here’s a list of essential items you’ll need:
Containers:
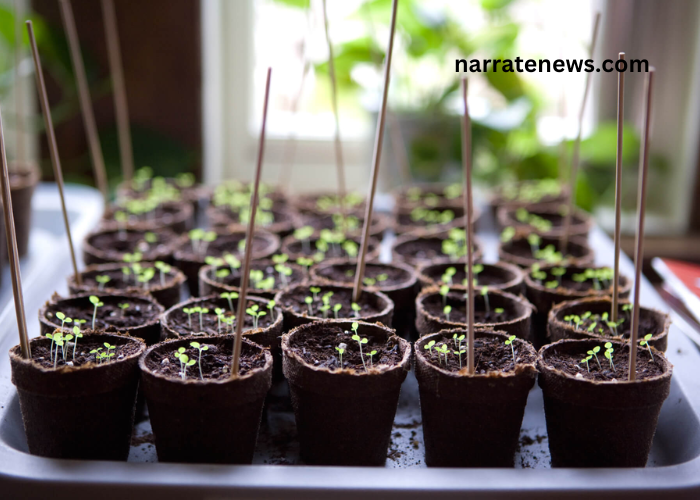
Choose containers that provide adequate space for seedlings to develop. Options include seed trays, cell packs, peat pots, or recycled containers with drainage holes. Ensure that the chosen containers are clean and sterile to prevent diseases.
Seed Starting Mix:
Use a high-quality seed starting mix that is well-draining and lightweight. Avoid using garden soil, as it may compact and impede seedling growth. Seed starting mixes are formulated to provide the ideal conditions for germination.
Seeds:
Acquire high-quality flower seeds from reputable suppliers. Check the expiration date on the seed packets to ensure viability. Some popular flower varieties for indoor starting include marigolds, petunias, zinnias, and cosmos.
Watering Can or Spray Bottle:
Maintain consistent moisture levels by using a watering can or spray bottle. A fine mist is preferable for delicate seedlings to avoid displacement and overwatering. Ensure that the containers have drainage to prevent waterlogging.
Grow Lights:
While natural sunlight is ideal, supplemental lighting may be necessary, especially during the early stages of growth. Invest in fluorescent or LED grow lights to provide sufficient light intensity for healthy seedling development.
Heat Mat:
Some flower seeds benefit from bottom heat to stimulate germination. A heat mat placed under the containers can provide a consistent and controlled temperature for optimal seed germination.
Labels:
Keep track of the different flower varieties by labeling your containers. Use durable and weather-resistant labels to prevent confusion once the seedlings are ready for transplanting.
Plastic Dome or Plastic Wrap:
Covering containers with a plastic dome or plastic wrap helps create a humid environment, promoting germination. Remove the cover once seedlings emerge to prevent excessive humidity.
Fan:
Air circulation is essential for preventing damping off, a fungal disease that affects seedlings. Use a gentle fan to create a subtle breeze, promoting stronger stem development.
Tray or Saucer:
Place containers on a tray or saucer to catch excess water and prevent mess. This also facilitates bottom watering by allowing containers to absorb water through the drainage holes.
Step-by-Step Guide to Starting Flower Seeds Indoors
Now that you have the necessary equipment and supplies, let’s delve into the step-by-step process of starting flower seeds indoors:
Step 1: Choose the Right Timing
Timing is crucial when starting flower seeds indoors. Determine the average last frost date in your region, and then count backward to establish the optimal sowing date. Consult seed packets for specific recommendations, as different flowers have varying germination and growth requirements.
Step 2: Prepare Containers and Seed Starting Mix
Select clean and sterile containers with drainage holes to prevent waterlogging. Fill the containers with a high-quality seed starting mix, leaving a small space at the top. Moisten the mix before planting to ensure uniform moisture distribution.
Step 3: Sow the Seeds
Follow the seed packet instructions for the recommended sowing depth and spacing. Plant multiple seeds in each container, as not all seeds may germinate. Gently press the seeds into the soil, covering them with a thin layer of seed starting mix.
Step 4: Label Containers
Label each container with the flower variety and date of planting. This is crucial for tracking the progress of different seeds and identifying seedlings once they emerge.
Step 5: Provide Adequate Moisture
Water the containers thoroughly after sowing, ensuring even moisture throughout the soil. Use a fine mist or a gentle watering can to avoid displacing seeds. Keep the soil consistently moist but not waterlogged.
Step 6: Cover Containers
Cover the containers with a plastic dome or plastic wrap to create a humid environment for germination. Place the containers in a warm location or use a heat mat to provide bottom heat if necessary.
Step 7: Ensure Proper Lighting
Place the containers in a location with ample natural sunlight. If natural light is insufficient, use grow lights positioned a few inches above the seedlings. Adjust the height of the lights as seedlings grow to maintain the appropriate light intensity.
Step 8: Monitor Temperature
Maintain a consistent temperature for optimal germination. Most flowers prefer temperatures between 60°F to 75°F (15°C to 24°C). A heat mat can help achieve and maintain the desired temperature.
Step 9: Thin Seedlings
Once the seedlings emerge and develop their first set of true leaves, thin them to ensure proper spacing and avoid overcrowding. Snip off the weaker seedlings at soil level, leaving the strongest ones to grow.
Step 10: Provide Air Circulation
Introduce a gentle fan to create a subtle breeze around the seedlings. This promotes sturdy stem development and helps prevent damping off by reducing excess humidity around the plants.
Step 11: Fertilize Seedlings
After the seedlings develop a few sets of true leaves, start feeding them with a diluted, balanced liquid fertilizer. Follow the recommended dosage on the fertilizer packaging to avoid overfeeding.
Step 12: Harden Off Seedlings
Before transplanting seedlings outdoors, gradually acclimate them to outdoor conditions through a process called hardening off. Place the seedlings outdoors in a sheltered location for increasing periods each day, exposing them to sunlight, wind, and fluctuating temperatures.
Step 13: Transplant Seedlings
Once the seedlings are adequately hardened off, transplant them into your outdoor garden. Choose a day with mild weather and prepare the planting holes in advance. Water the seedlings well before and after transplanting to minimize stress.
Tips for Success
Use a Quality Seed Starting Mix:
Invest in a well-draining and sterile seed starting mix to provide a healthy environment for seed germination and early seedling growth.
Maintain Consistent Moisture:
Seedlings are particularly sensitive to fluctuations in moisture. Keep the soil consistently moist but not waterlogged to ensure successful germination and growth.
Provide Ample Light:
Ensure that your seedlings receive sufficient light, either from natural sunlight or supplemental grow lights. Inadequate light can lead to leggy, weak seedlings.
Adjust Light Height:
If using grow lights, adjust their height as seedlings grow to maintain an optimal light intensity. Aim to keep the lights 2-4 inches above the seedlings.
Rotate Containers:
To promote even growth, rotate the containers regularly to prevent seedlings from leaning toward the light source.
Monitor Temperature:
Maintain a consistent temperature for germination and seedling growth. Use a thermometer to ensure the environment stays within the preferred temperature range.
Practice Thinning:
Thin seedlings to ensure proper spacing and prevent overcrowding. This allows the remaining seedlings to receive adequate light and nutrients.
Be Mindful of Fertilization:
Start fertilizing seedlings with a diluted, balanced fertilizer once they develop a few sets of true leaves. Avoid over-fertilizing, as this can lead to nutrient imbalances.
Harden Off Gradually:
Gradually expose seedlings to outdoor conditions during the hardening-off process. This helps them acclimate to changes in temperature, sunlight, and wind.
Transplant Carefully:
When transplanting seedlings into the garden, handle them gently to minimize stress. Water the seedlings well before and after transplanting to support their adjustment.
Common Challenges and Solutions
While starting flower seeds indoors is a rewarding endeavor, it comes with its share of challenges. Here are some common issues and solutions:
Damping Off:
Damping off is a fungal disease that affects seedlings, causing them to wilt and collapse. To prevent damping off, ensure proper air circulation, avoid overwatering, and use a sterile seed starting mix.
Leggy Seedlings:
Leggy or elongated seedlings indicate insufficient light. Adjust the height of grow lights to keep them close to the seedlings, and provide adequate light duration to promote sturdy growth.
Overwatering:
Overwatering can lead to root rot and other issues. Allow the soil surface to dry slightly between watering and ensure that containers have proper drainage.
Underwatering:
Inadequate moisture can result in stunted growth and seedling stress. Check the soil regularly, and water when the top inch feels dry. Maintain consistent moisture levels.
Poor Germination:
Poor germination may be due to factors such as old or low-quality seeds, incorrect planting depth, or inadequate temperature. Use fresh, quality seeds, follow recommended planting depths, and ensure optimal temperature conditions.
Fertilization Issues:
Over-fertilization can lead to burned or stressed seedlings. Dilute fertilizers as per package instructions and apply them when seedlings have developed a few sets of true leaves.
Inadequate Hardening Off:
Skipping or rushing the hardening-off process can shock and stress seedlings when exposed to outdoor conditions. Gradually acclimate seedlings over a period of 7-10 days before transplanting.
Transplant Shock:
Transplant shock can occur when seedlings are moved from indoor to outdoor environments. Minimize shock by transplanting on mild, overcast days and watering thoroughly before and after transplanting.
Conclusion
Starting flower seeds indoors is a fulfilling and empowering way to kickstart your gardening season. The process, from selecting seeds to nurturing seedlings and finally transplanting them into your outdoor garden, allows you to witness the complete lifecycle of your flowers. Armed with the knowledge of proper techniques, essential supplies, and potential challenges, you can embark on a successful journey of growing beautiful blooms right from the comfort of your home.
As you immerse yourself in the art and science of starting flower seeds indoors, remember that each step contributes to the overall well-being and vitality of your garden. The joy of seeing tiny seeds transform into robust seedlings and, eventually, into blooming flowers is a testament to your dedication and the remarkable journey of life and growth.
Related Posts

nike:3ryxln2__cc= shoes

Color:ynhbe-p2w-w= Aquamarine