How to schedule a text on iphone
In today’s fast-paced world, staying connected with friends, family, and colleagues is more important than ever. However, sending messages at the right time can be challenging, especially when you’re juggling multiple responsibilities or navigating different time zones. Thankfully, with the advancements in technology, scheduling a text on your iPhone has become a simple and convenient way to ensure your messages are delivered at the perfect moment. In this comprehensive guide, we’ll walk you through the process of scheduling texts on your iPhone, so you can streamline your communication and never miss an opportunity to connect.
Understanding the Benefits of Text Scheduling:
Before we dive into the how-to, let’s explore why scheduling texts can be a game-changer for iPhone users. Whether you’re sending birthday wishes to a friend in another country, reminding a colleague about an upcoming meeting, or simply planning your communications in advance, text scheduling offers several key benefits:
Convenience: Scheduling texts allows you to compose messages at your convenience and have them sent automatically at a later time. This means you can plan your communications ahead of time, freeing up your schedule and reducing the need for last-minute texting.
Accuracy: By scheduling texts in advance, you can ensure that your messages are delivered at the optimal time, regardless of your current availability or location. This is particularly useful when communicating across different time zones or during busy periods when you may not be able to respond immediately.
Efficiency: Text scheduling can help you stay organized and efficient by allowing you to plan your communications in advance. Whether you’re managing personal relationships or professional commitments, having the ability to schedule texts can streamline your workflow and ensure timely communication.
Now that we’ve covered the benefits, let’s delve into the step-by-step process of scheduling texts on your iPhone.
Step 1: Update to the Latest iOS Version
Before you can schedule texts on your iPhone, make sure your device is running the latest version of iOS. Apple often introduces new features and improvements with each software update, so it’s essential to keep your device up to date to access the latest functionality.
To check for updates, go to Settings > General > Software Update on your iPhone. If an update is available, follow the on-screen instructions to download and install it.
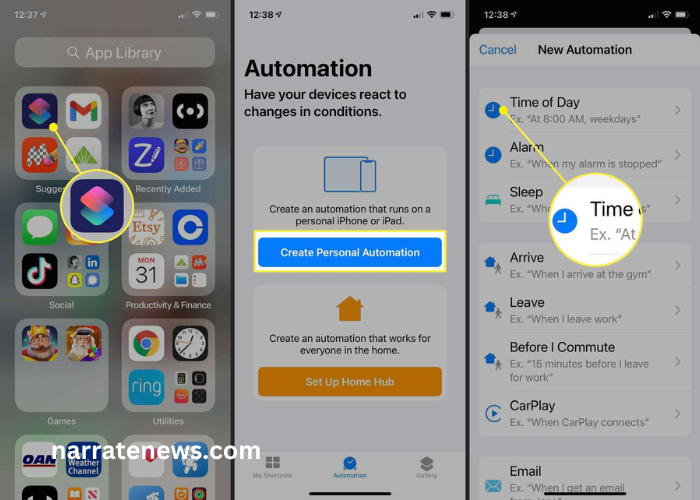
Step 2: Enable Message Scheduling with Shortcuts
While iOS doesn’t offer built-in support for text scheduling, you can leverage the Shortcuts app to create custom automation routines that include scheduling messages. Shortcuts allow you to automate various tasks on your iPhone, including sending messages at specific times.
If you haven’t already done so, download the Shortcuts app from the App Store and follow these steps to enable message scheduling:
Open the Shortcuts app on your iPhone.
Tap the “+” icon in the top right corner to create a new shortcut.
Tap “Add Action” to select the actions you want to include in your shortcut.
Search for and select the “Send Message” action.
Enter the recipient’s name and the message you want to send.
Tap the clock icon next to the “Send Message” action to set the delivery time.
Choose the date and time you want the message to be sent.
Once you’ve configured the shortcut, tap “Next” to review and name your shortcut.
Finally, tap “Done” to save your shortcut.
Step 3: Schedule Your Texts
With the Shortcuts app configured, you can now schedule texts on your iPhone with ease. Here’s how to do it:
Open the Shortcuts app on your iPhone.
Select the shortcut you created for scheduling messages.
Enter the recipient’s name and the message you want to send.
Tap the clock icon next to the message field to set the delivery time.
Choose the date and time you want the message to be sent.
Once you’ve configured the message and delivery time, tap “Next.”
Review the details of your scheduled message, then tap “Done” to schedule it.
That’s it! Your message is now scheduled to be sent at the specified time, and you can rest assured knowing that it will be delivered exactly when you want it to be.
Tips for Effective Text Scheduling:
As you begin scheduling texts on your iPhone, keep these tips in mind to make the most of this feature:
Be Mindful of Time Zones: If you’re scheduling messages for recipients in different time zones, double-check the delivery time to ensure it aligns with their local time.
Plan Ahead: Take advantage of text scheduling to plan your communications in advance, whether it’s sending birthday wishes, setting reminders, or following up on important tasks.
Use Templates: Consider creating reusable message templates for common scenarios, such as scheduling weekly check-ins or sending holiday greetings. This can save you time and effort when composing messages.
Review Scheduled Messages: Periodically review your scheduled messages to ensure they’re still relevant and timely. You can edit or delete scheduled messages as needed.
Conclusion
In conclusion, scheduling texts on your iPhone is a valuable tool for staying organized, efficient, and connected in today’s digital age. By leveraging the Shortcuts app, you can automate the process of sending messages at specific times, allowing you to focus on what matters most. Whether you’re managing personal relationships or professional commitments, text scheduling offers a convenient and effective way to streamline your communication and make the most of your iPhone.
Related Posts

nike:3ryxln2__cc= shoes

Color:ynhbe-p2w-w= Aquamarine